I use Blogger's Minima template in black. I like its simple format that lets the pictures pop on the page. However, whatever template you use shouldn't matter if you make the necessary changes within the html of the template.
The following assumes some knowlege of html, but not much. If you're unsure of what you are doing, I suggest creating a test blog that only you can see. You can then do all of your template and background changes there, then copy and paste the code to your blog. This allows you to play around with your blog without it being in mid-change when someone stops by your blog to visit.
First you need to change the size of your blog's template. You need to go into Edit Template. I changed my outer wrapper and header wrapper to 1100 px. My main wrapper is set at 840px and the sidebar-wrapper is at 220px. These allow for the larger sized pictures. You don't have to use these exact measurements. Just make sure that your outer and header wrappers are large enough that both the main and side wrappers will fit into them. You need to make sure your main wrapper is slightly larger than the width in which you set your pictures. I chose to have my pictures be 800px wide.
You will need to set up an account on an online picture hosting site. I use Photo Bucket.
The following steps will be necessary everytime you post a picture:
1. First you need to load your pictures to Photo Bucket (or whatever hosting site you chose).
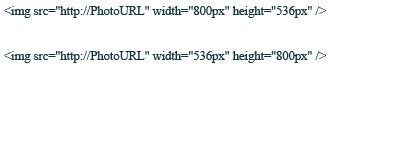
2. When you post a picture, go to the Edit HTML tab(not compose tab) and paste in one of the following:

I use the top for horizontal pics and the bottom for vertical pics. You can adjust the sizes to anything you want, but this works with the width I've set up for my blog layout. I keep these html settings saved on my computer and just copy and paste in the one I need. Then just paste in the url that you get from Photo Bucket (or whatever service you use) and replace the url within the quotations. Viola!
I hope this tutorial works for you. If you have any questions, you can email me anytime.

7 comments:
thank you so much for your tutorial. it has helped me greatly!!! i do have a question though, where do i replace the url within which quotations? i created a photobucket which makes the pictures come out much bigger, but i can't seem to get the sizing right. can you please help? thanks in advance!!!
Author Comment
I have re-posted the html info. For some reason it wasn't showing the correct code. I'm sorry for posting the code as a picture, but I'm not knowledgeable enough with coding to know how to post code without it turning into whatever it is the code is meant to do...some day I will take the time to figure it out.
@paul and tricia - your photo's url goes in between these quotations: "http://PhotoURL"
The photo size I've chosen (800x536) is based on basic photo sizes. I played around in Photoshop until I found a size I liked. You just need to make sure that your horizontal and vertical numbers are in direct relation to the original photo size.
Thanks so much for your quick response!! Am I doing something wrong? I replaced the photo's URL for "http://PhotoURL" but my pictures are still being cut off. Do I have to change the size of the photo within photobucket first? Please help!!!
@ paul and tricia - you shouldn't have to do anything to your photos in photobucket. I took at look at your site and my guess would be that you have your picture size set too large for your wrapper size. If that is the case, your pictures will be cut off in order to fit within the wrapper size that you have set in your html (I did that, that's how I know). I would suggest going back into your html and editing the wrapper sizes. Use the ones I suggest above. I have done a lot of tweaking and have found that those sizes work best without getting too large for most monitors. Also, make sure your photo size within the code is not too large. As I said, if you use 800x536, you should find that your pictures are plenty large enough and if you set your main wrapper just slightly larger (mine is 840px), then you should be just fine. Also, make sure that you are using the correct code for horizontal pictures vs. the code set up for vertical pictures.
Author comment: If you go to the our blogger template link above, you will find the original code. You will have to change the sizes within the code as they have it set at 100x100 just as an example. I copied and pasted their code and then changed the pixel sizes to what I needed, then saved that so that I just copy and paste it every time I need it!
Author comment: if you use Photobucket, you need to copy the "Direct Link" code. The other two will mess up your picture size.
hi, I can't figure out why my pictures keep getting cut off! please help! I did the 100% one too but nothing is seeming to work.
thank you!
Post a Comment